Connecting to FX Serial

Rosetta & Classic Anleitung

Aktualisierung

Lizenzierung

Essentielles

Follow these simple steps to connect your PilotAware FX to a compatible device over RS232. This allows the FX to send and receive data (such as traffic information) from devices like FLARM, enhancing your situational awareness.
Step-by-Step

  1. ‍Identify the FX Output Port:
    ‍
    ‍
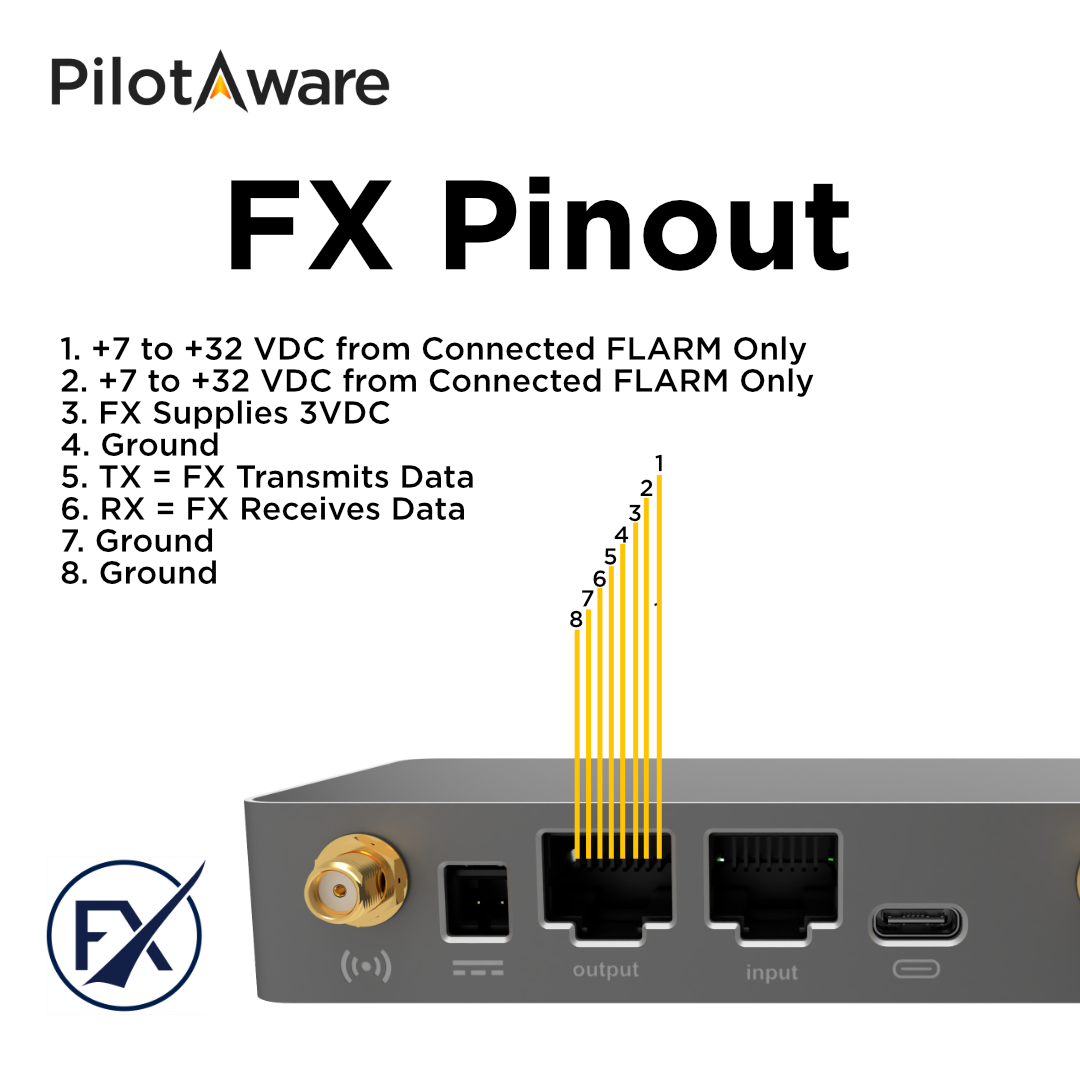
    • Locate the Output Port on the FX device. This is where you will connect your RS232-compatible cable, such as an RJ12 or RJ45 cable.
    • This port uses an RJ45 connector with specific pin assignments for power, data transmission, and ground. Familiarize yourself with the pinout to ensure correct connections.

‍

  1. Review the Pinout:
    ‍
    ‍
    • Pin 1 and Pin 2 (+9 to +26 VDC from FLARM): These pins accept power from a connected FLARM device, supplying power to the FX.
    • Pin 3 (3V DC from FX): Provides a 3V output from the FX device.
    • Pin 4 (Ground): Main ground pin to stabilize the connection.
    • Pin 5 (TX - Transmit Data): Transmits data from the FX device to the connected device.
    • Pin 6 (RX - Receive Data): Receives data from the connected device to the FX device.
    • Pin 7 and Pin 8 (Ground): Additional grounding pins to ensure a stable connection.
  2. Connect the Cable:
    ‍
    • Insert an RS232-compatible RJ12 or RJ45 cable into the FX’s output port.
    • Make sure that the cable’s pin configuration matches the FX pinout for proper alignment with power, TX, RX, and ground pins.
  3. Configure RS232 Settings on FX:
    ‍
    • Connect your display device (e.g., tablet) to the FX WiFi network and access the FX Dashboard at 192.168.1.1.
    • Navigate to the Settings Page to configure RS232 settings.
    • Choose the protocol that matches your connected device:
      ‍
      • FLARM: If you’re using a FLARM device.
      • TRIG: For specific transponder compatibility.
      • Automatic: General setting for most RS232-compatible devices.
    • Set the Baud Rate (if necessary)
      ‍
      ‍
      • The default baud rate is Automatic, but if your connected device requires a specific baud rate, select it in the settings.

Hilfreich?

JaNein

Wir freuen uns, dass dir dieser Artikel weitergeholfen hat.

Vielen Dank, dass Sie uns Ihr Feedback gegeben haben.

Hoppla! Beim Absenden des Formulars ist etwas schief gelaufen.

Danke, dass du uns Bescheid gegeben hast

Vielen Dank, dass Sie uns Ihr Feedback gegeben haben.

Hoppla! Beim Absenden des Formulars ist etwas schief gelaufen.

Newsletter-Anmeldung

Seien Sie der Erste, der in unserem neuen Newsletter und Blog von unseren neuen Produkteinführungen und Innovationen erfährt.
Stellen Sie sicher, dass Sie das Beste aus Ihrem PilotAware herausholen und über Neuigkeiten und Kommentare von EC auf dem Laufenden bleiben.
Danke! Deine Einreichung ist eingegangen!
Hoppla! Beim Absenden des Formulars ist etwas schief gelaufen.
0
Durch Anklicken „Alle Cookies akzeptieren“, stimmen Sie der Speicherung von Cookies auf Ihrem Gerät zu, um die Seitennavigation zu verbessern, die Nutzung der Website zu analysieren und unsere Marketingaktivitäten zu unterstützen. Sehen Sie sich unsere an Allgemeine Geschäftsbedingungen für weitere Informationen.